Elements and You
Adapted from Imagine the Universe activities.
- Full Activity (PDF)
- Key for Universe of Beads activity (PDF)
- Worksheet for Universe of Beads activity (PDF)
- Key for Element Bottles activity (PDF)
- Periodic Table - Black and White version (PDF)
- Periodic Table - Color version (PDF)
- YouTube video of an activity similar to the clay fusion activity
Summary:
Students are introduced to the periodic table and the concept of atomic elements. The group discusses how all material in the Universe is composed of elements and that the atom is the smallest particle that still has the physical and chemical properties of any given element. As an exercise in statistics, the students participate in a counting experiment in which they sample a 'Universe bead mix' (where each bead color represents a different element present in the Universe) to estimate the overall composition of the Universe. They compare their findings of the Universe's overall composition with the composition of various different objects in the Universe that are represented by mixtures of rice, beans and other dried goods in jars. Finally, students are introduced to the idea that hydrogen fusion creates heavier elements inside a star.
Audience:
A group of 20-25 students (grade range 5th-7th)
Objectives:
- Understand what an element is
- Familiarize the students with a periodic table and common elements
- Determine the most abundant elements in the Universe
- Learn how heavier elements form from fusion
- Gain knowledge of the processes in the interior of a star
- Explore the concept of composition in the context of astronomical objects
- Explore how elements link us to stars
Materials:
- Plain pound cake
- Knife to cut the pound cake
- Gloves or wet wipes for safe food handling
- Napkins or paper plates to hold the pound cake (enough to serve the group, if allowed)
- Example(s) of pure elements (sheet of aluminum, copper tubing, elemental density cubes, etc.)
- Large display copy of a periodic table
- Periodic table handouts for each student
- Large bowl to mix the bead mix
- Multi-colored pony beads
- Small scoops
- Universe of Beads key
- Universe of Beads worksheets
- Bottle activity ingredients
- white rice
- brown rice
- split peas
- black beans
- white beans
- pinto beans
- red beans
- red lentils
- brown lentils
- 8 oz plastic bottles with lids
- Funnel for pouring ingredients into bottles
- Tape for sealing bottles
- Bottle Keys
- Clay (or Sculpey, for a more permanent model) of 5 or more different colors
Preparation:
- Universal of Beads: ~15 minutes
In this activity, each element is represented by a different color of bead. Mix the ingredients ahead of the planned activity in a large bowl. Using the same, or larger, size "measuring cup" for preparation as the students will each have during the activity. Mix the following:
- 50 scoops of clear beads (to represent 90% abundance of hydrogen in universe)
- 5 scoops of light blue beads (to represent 9% abundance of helium)
- 3 scoops of dark blue beads (to represent 0.08% abundance of oxygen)
- 2 scoops of black beads (to represent 0.03% abundance of carbon)
- 1 scoop of green beads (to represent 0.01% abundance of nitrogen)
- 1 scoop of orange beads (to represent 0.01% abundance of neon)
- 1 scoop of pink, purple, red, and yellow beads in roughly equal amounts (to represent 0.01% abundance of magnesium, silicon, iron, and sulfur together)
- Bottle Activity: ~4 hours
In this activity, each element is represented by a different food. Prepare mixtures of these items according to the recipes below for the sources we are modeling. Note that these abundances are by volume, not weight. Because these items are approximately the same size, using dry measurements (volume) is very roughly equivalent to measuring numbers of atoms.
The number of bottle sets that you make is somewhat discretionary. The more sets you have, the smaller the group students can work in. 3-4 students working together is ideal. For a group of 25 students, that would be 6-8 bottle sets.
Place each mixture into a separate jar or bottle (these recipes are scaled for 8 oz. plastic bottles, available from many online suppliers). In each set, label each bottle with a number correlating to a specific source, and then record the key for later identification (ex. #1 = supernova). Cap all the jars/bottles. Taping shut the bottles when you are done can help to ensure that no food items escape into the classroom if this is a concern, as well as discourage students from opening the bottles, which may disrupt the activity and ruin the bottles for use at future events.
For each source, the recipes give the abundance (in %) and the volume of each element required in drymeasured cups (C), tablespoons (tbsp), and teaspoons (tsp). Note that the percentages may not add to 100% due to rounding amounts and excluding less significant elements.
Carbonaceous Chondrite (a type of meteorite) O 44.3% 5 tbsp + 2 tsp Brown Rice H 30.8% 4 tbsp White Rice Mg 6.2% 1 tbsp Red Beans Si 5.5% 1 tbsp Pinto Beans Fe 4.9% 2 tsp Red Lentils C 4.2% 2 tsp Black Beans Supernova Remnant O 42.2% 5 tbsp Brown Rice Fe 36.7% 4 tbsp + 3 tsp Red Lentils C 11.1% 1 tbsp + 1 tsp Black Beans Si 3.7% 2 tsp Pinto Beans Mg 2.8% 2 tsp Red Beans Human Body H 61.6% 1/2 C White Rice O 26.3% 3 tbsp + 1 tsp Brown Rice C 10.0% 1 tbsp Black Beans N 1.5% 1 tsp Brown Lentils The Sun H 92.1% 1/2 C + 3 tbsp + 1 tsp White Rice He 7.8% 4 tsp Green Split Peas Earth's Atmosphere N 78.0% 1/2 C + 1 tbsp Brown Lentils O 21.0% 2 tbsp + 2 tsp Brown Rice Ar 1.0% 1/2 tsp White Beans - Clay star: ~ 2 hours to assemble
For this demonstration, we use the following color correlations as an example, but the colors can be changed. Regardless of the colors you use, it is easier to see the layers if adjacent colors contrast with each other.
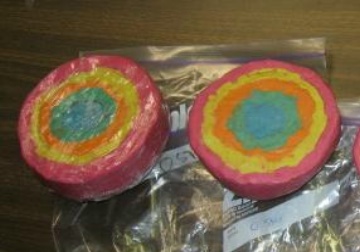
Clay Color Element Red Hydrogen Yellow Helium Orange Carbon Green Oxygen Blue Neon Make the clay star in 5 color-coded layers.
- Start by making a ball about 2 inches in diameter using the blue clay
- Completely cover that ball with a layer of green clay about an inch thick
- The next layer will be orange in color with a shell thickness of ~ 1 inch
- The next layer will be yellow in color with a shell thickness of ~ 2 inches
- The next layer will be red in color with a shell thickness of ~ 2-3 inches
You may make this model out of Sculpey instead of clay if you would like a more permanent version. If you pursue this course, you should cut this model in half before baking it. This step can wait until the demonstration if you are using clay, but we found that pre-cutting the ball as the layers were added can be helpful for the demonstration because clay can be very hard to cut through.
Make extra fusion demonstration small clay balls
- 4 red ~ 1 inch in diameter for hydrogen
- 3 yellow ~ 1.5 inches in diameter for helium
- 1 orange ~ 2 inches in diameter for carbon
- 1 green ~ 2.5 inches in diameter for oxygen
- 1 blue ~ 3 inches in diameter for neon

Some portions of this preparation can be very time-intensive. It goes faster with friends, so have a party to make bottles and clay balls!


