Lesson Plans: Time that Star! (Day 1)
Time That Star!
Day 1
Summary
On Day 1 of this lesson, students study the motion of pendulums through a hands-on lab. In groups of 3, students set up a simple pendulum and record the time it takes for the pendulum to make varying numbers of swings. They do this for two different lengths of pendulum arms, plot the results and reflect on those results.
Materials
- Teacher
- roll of masking tape
- a few extra meter sticks to aid in measuring the lengths of the strings
- For each triad of students
- 2 pieces of string (one approx. 60cm, one approx. 30cm)
- mass of about 1/4 to 1 kg that would serve as the pendulum bob (for example, a rubber ball, a piece of clay, a large key, etc.)
- wood block (recommended) or a piece of thick cardboard at least 30 cm x 30 cm
- small brass hook that would screw into the wood or cardboard
- two metric rulers
- one metric tape measure
- stop watch or digital wrist watch with sub-second timing (you will be timing swings of a pendulum in fractions of seconds)
- handouts
Introduction
Have students discuss the definition of a cycle or periodic behavior. Examples of periodic behavior could include the movement of a pendulum or clock, the brightness of a lighthouse beam as you observe it from a fixed location, or the shape of the Moon as a function of time. Students can get a better understanding of this concept by performing the hands-on lab described below.
Procedure
Hand out the procedure sheet to each group in order for them to not only hear the procedure, but to see it as well.
- Triad decides who is:
- Data Keeper / Reader
- Materials Manager / Checker
- Time Keeper / Facilitator
- Materials Manager retrieves all materials listed from teacher. Reader should read all directions.
- Each triad should place two chairs back-to-back separated by about 20 cm.
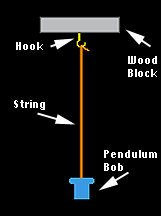
- Materials Manager turns the hook into the wood/cardboard and tie the 60 cm string to the hook. Next, s/he ties the 60 cm string around the mass to make a simple pendulum. Then, place the wood block on top of the chair backs with the pendulum dangling between the two chairs.
- A meter stick should be taped on the floor below the pendulum, so that when the pendulum is at rest, it dangles over the 50 cm mark on the meter stick.
- Checker and other group members should help confirm the "set-up" of the lab as seen below.
- The mass of the pendulum should be gently "pulled out" by the Materials Manager to the 75 cm mark, making sure the string is taut. Now when the Time Keeper looks directly over it, he or she sees the 75 cm mark covered by the mass.
- Let time = 0 when the pendulum is released from being held over
75 cm. When the Time Keeper says go, the pendulum is released and the
watch started. When the pendulum reaches its maximum movement
(roughly over 25 cm), someone says "stop", and the watch
is stopped. Repeat this measurement 5 times, making sure the Data
Keeper records each trial on the Data Table under t1.
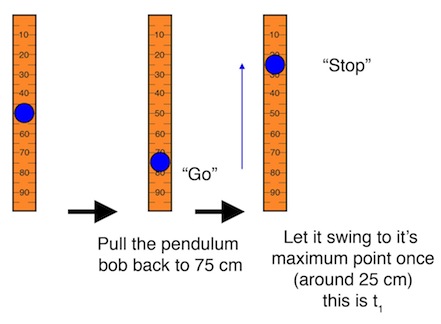
Illustration of the t1 measurement. Show me an animation of this.
Now repeat the procedure with someone saying "stop" the second time the pendulum reaches its maximum movement near 25 cm. The Data Keeper records each trial on the Data Table under t2.
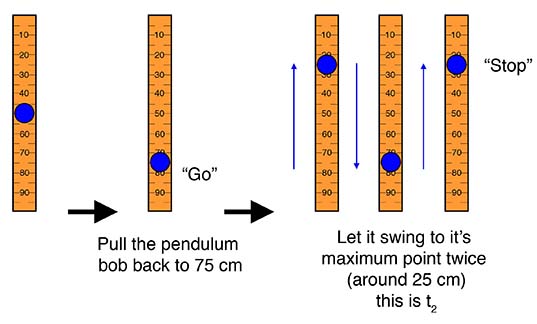
Illustration of the t2 measurement. Show me an animation of this.
Repeat the procedure again, this time saying "stop" the third time the pendulum reaches its maximum movement near 25 cm. The Data Keeper records each trial on the Data Table under t3.
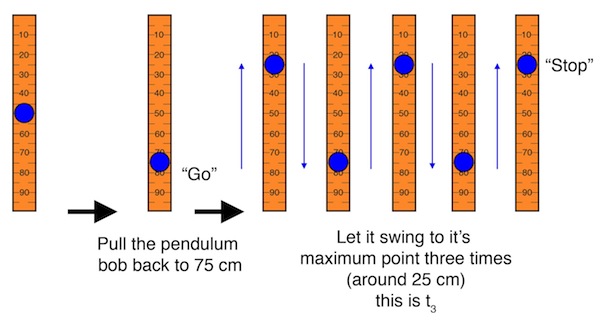
Illustration of the t3 measurement. Show me an animation of this.
You can even do this for the fourth time if the pendulum continues to reach its maximum movement that many times!
- The Data Keeper will record data for at least 3 complete swings of the pendulum (4 if possible). Each measurement should be made 5 times, and the mean determined from the 5 trials and recorded on the Data Table.
- Again, let time = 0 when the pendulum is released from being
held over 75 cm. When Time Keeper says "go", the pendulum
is released and the watch started. This time, the pendulum reaches
its maximum movement when it swings back over 75 cm, and someone
says "stop". The Data Keeper should record each trial as
ta on the Data Table. Repeat this measurement 5 times.
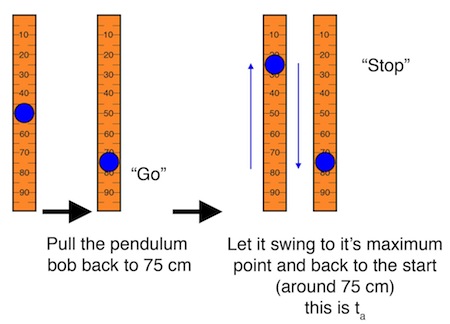
Illustration of the t1 measurement. Show me an animation of this.
Now, repeat the procedure with someone now saying "stop" the second time the pendulum reaches its maximum movement near 75 cm. The Data Keeper should record this as tb) on the Data Table. Take this measurement 5 times.
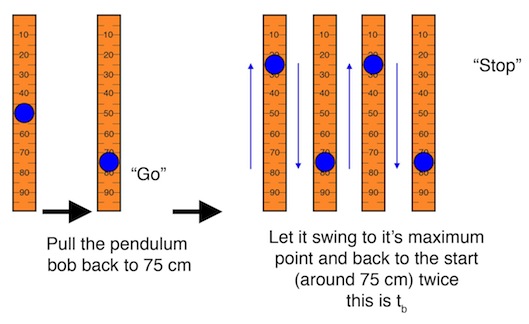
Illustration of the tb measurement. Show me an animation of this.
Repeat the procedure again, this time with someone saying "stop" the third time the pendulum reaches its maximum movement near 75 cm. The Data Keeper should record the time for each of 5 trials under tc on the Data Table.
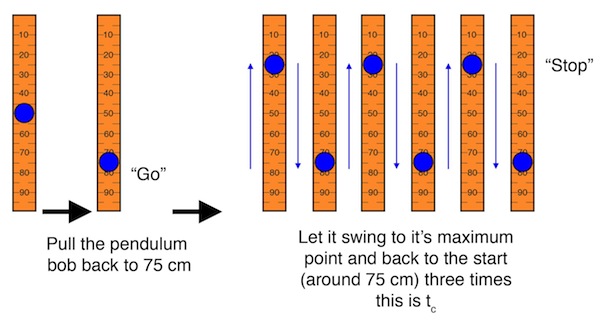
Illustration of the tc measurement. Show me an animation of this.
You can do this for the fourth time if the pendulum continues to reach its maximum movement that many times.
- The Data Keeper will record data for at least 3 complete swings of the pendulum (4 if possible). Each measurement should be made 5 times, and the mean determined from the 5 trials and recorded on the Data Table.
- After the data are collected and appropriately placed on the Data Table, it is now time to plot it. Each team member is responsible for making their own plot of the length of the swing versus the mean time in seconds.
- Repeat steps 4-12, but substitute the 30 cm string for the 60 cm string.
Pendulum setup
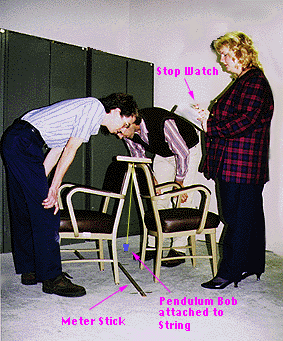
Lab setup
The lab begins here (Reader--be careful to read this step carefully!).
Independent Practice
The teacher should pass out the Time that Star! Day 1 Wrap-up worksheet to each student in order to assess individual understanding.
